Processing a Refill Prescription
-
Data Entry
-
Packaging
-
Technical Validation
-
Clinical Review
Processing a refill can be completed from either the Workbench or the patient's Profile tab.
Data Entry
For refill prescriptions, the Data Entry queue includes:
-
Using the Intake window for refill prescriptions and adjudicating them through Rx Detail.
-
Processing and adjudicating prescriptions that were added to the Workbench, either from the Intake window or one of the programs the patient is enrolled in or your pharmacy is registered for.
For more information about prescriptions that are already in the Data Entry queue, see Processing Prescriptions from the Data Entry Queue.
Select the applicable tab to learn about processing refill prescriptions in your province.
For more information, use the dropdowns below.
To refill a prescription from the Workbench:
-
From the Workbench, select Intake. The Intake window appears.
-
Do one of the following:
-
In the Refill Rx field, enter the prescription number and press Enter on your keyboard. If entering multiple prescription numbers, separate them using a forward slash (/).

-
Select the Profile button. Highlight the prescription(s) that are being refilled and select Refill. A R indicator appears beside the prescription(s) selected for refill. Select OK.
Information is automatically populated in the Patient, Prescriber and Drug sections based on the information from the prescription(s).
If you're only collecting the prescription from the patient and the prescription is being adjudicated at another workstation, or at another time, once you have a patient selected, you can select Add to Workbench. This adds the prescription to the Data Entry queue for later processing. It is recommended a prescription is scanned at Intake before doing this.
For more information about processing this prescription at another workstation or at a later time, see Processing Prescriptions from the Data Entry Queue.
-
-
Select Process. The prescription opens in Rx Detail.
-
Verify the information in Rx Detail and make any necessary changes.
If Close is selected when in Rx Detail, the prescription remains in the Data Entry queue and can be accessed from there.
-
Select the Third Party tab.
-
Enter or update information in the following fields if desired. For more information on these fields, refer to the Rx Detail Third Party Tab section of the British Columbia PPM User Guide.
-
Fill Type - displays the Fill Type code being transmitted for the dispense. This is defaulted as follows:
-
N - New/ReAuth For Non-narcotic - for new or reauthorized prescriptions for non-narcotic drugs.
-
P - Part-Fill First Fill - for new or reauthorized prescriptions for narcotic drugs.
-
Q - Part Fill Refill - for refills of prescriptions for narcotic drugs.
-
R - Refill for Non-narcotic - for refills of prescriptions for non-narcotic drugs.
-
-
MMI and CS Codes expander button
 - MMI and CS Code(s) are required in certain prescribing or dispensing situations. For guidance, refer to the Supplementary Table in the British Columbia PPM User Guide.
 -
Select the expander button
. -
Dropdown the applicable MMI header.
-
Double-click on the appropriate CS code or select the CS code and select the >> button.
-
Repeat steps b - c to add additional CS codes, up to a maximum of 7 if needed.
-
Select OK.
-
-
-
Select Fill.
-
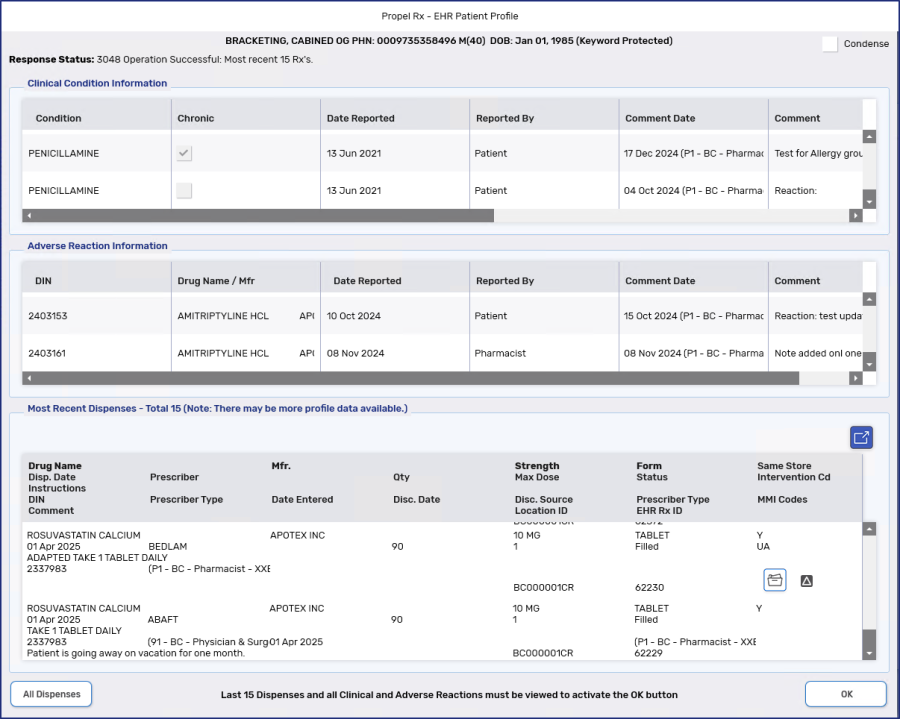
The patient's EHR Profile opens. The Profile displays information about the patient's clinical conditions, adverse reactions, and prescription history. You must view all clinical conditions and adverse reactions and the last 15 prescriptions before the OK button is enabled.
When filling a succession of prescriptions, the EHR Profile displays only once before the first prescription is filled.
Select OK.
-
If any warnings are returned by the EHR, the EHR Response window opens. After reviewing the warnings, select OK.
-
The TAC/TDU Response window opens. DUE information returned by the EHR is displayed at the bottom of the window. Use the vertical scrollbar, if applicable to view all the DUEs. All DUEs must be viewed before the OK button is enabled.
Optional: Additional details of each DUE can be viewed by selecting the applicable record and then Detail.
The TAC/TDU Response window appears for each prescription that is processed. Batched prescriptions are not completed until the TAC/TDU Response windows are viewed.

Select OK once you are done viewing the DUE responses.
-
The Claim Summary window opens. Information from the EHR is displayed in the Claim Response Message section including:
-
Plan information (i.e. expiry date)
-
Pricing information (i.e. LCA/RBP pricing, fee)
-
Drug information (i.e. special authority, benefit status)
-
Restrictions
Review the window and make any necessary waives.
The EHR response messages are not stored in the prescription. This means you cannot detail the prescription afterwards to view the messages. Codes are printed on the receipt which correspond to the messages.
-
-
Select OK.
To refill a prescription from the patient's Profile tab:
-
Search for and select a patient.
-
Select the Profile tab.
-
Highlight the prescription(s) that need to be refilled.
-
Select Refill. The prescription(s) open in Rx Detail.
-
Verify the information in Rx Detail and make any necessary changes.
If Close is selected when in Rx Detail, the prescription remains in the Data Entry queue and can be accessed from there. For more information, see Processing Prescriptions from the Data Entry Queue.
-
Select the Third Party tab.
-
Enter or update information in the following fields if desired. For more information on these fields, refer to the Rx Detail Third Party Tab section of the British Columbia PPM User Guide.
-
Fill Type - displays the Fill Type code being transmitted for the dispense. This is defaulted as follows:
-
N - New/ReAuth For Non-narcotic - for new or reauthorized prescriptions for non-narcotic drugs.
-
P - Part-Fill First Fill - for new or reauthorized prescriptions for narcotic drugs.
-
Q - Part Fill Refill - for refills of prescriptions for narcotic drugs.
-
R - Refill for Non-narcotic - for refills of prescriptions for non-narcotic drugs.
-
-
MMI and CS Codes expander button
- MMI and CS Code(s) are required in certain prescribing or dispensing situations. For guidance, refer to the Supplementary Table in the British Columbia PPM User Guide. -
Select the expander button
. -
Dropdown the applicable MMI header.
-
Double-click on the appropriate CS code or select the CS code and select the >> button.
-
Repeat steps b - c to add additional CS codes, up to a maximum of 7 if needed.
-
Select OK.
-
-
-
Select Fill.
-
The patient's EHR Profile opens. The Profile displays information about the patient's clinical conditions, adverse reactions, and prescription history. You must view all clinical conditions and adverse reactions and the last 15 prescriptions before the OK button is enabled.
When filling a succession of prescriptions, the EHR Profile displays only once before the first prescription is filled.
Select OK.
-
If any warnings are returned by the EHR, the EHR Response window opens. After reviewing the warnings, select OK.
-
The TAC/TDU Response window opens. DUE information returned by the EHR is displayed at the bottom of the window. Use the vertical scrollbar, if applicable to view all the DUEs. All DUEs must be viewed before the OK button is enabled.
Optional: Additional details of each DUE can be viewed by selecting the applicable record and then Detail.
The TAC/TDU Response window appears for each prescription that is processed. Batched prescriptions will not complete until the TAC/TDU Response window is viewed.
Select OK once you are done viewing the DUE responses.
-
The Claim Summary window opens. Information from the EHR is displayed in the Claim Response Message section including:
-
Plan information (i.e. expiry date)
-
Pricing information (i.e. LCA/RBP pricing, fee)
-
Drug information (i.e. special authority, benefit status)
-
Restrictions
Review the window and make any necessary waives.
The EHR response messages are not stored in the prescription. This means you cannot detail the prescription afterwards to view the messages. Codes are printed on the receipt which correspond to the messages.
-
-
Select OK.
Next Steps?
For more information, use the dropdowns below.
To refill a prescription from the Workbench:
-
From the Workbench, select Intake. The Intake window appears.
-
Do one of the following:
-
In the Refill Rx field, enter the prescription number and press Enter on your keyboard. If entering multiple prescription numbers, separate them using a forward slash (/).
-
Select the Profile button. Highlight the prescription(s) that are being refilled and select Refill. A R indicator appears beside the prescription(s) selected for refill. Select OK.
Information is automatically populated in the Patient, Prescriber and Drug sections based on the information from the prescription(s).
If you're only collecting the prescription from the patient and the prescription is being adjudicated at another workstation, or at another time, once you have a patient selected, you can select Add to Workbench. This adds the prescription to the Data Entry queue for later processing. It is recommended a prescription is scanned at Intake before doing this.
For more information about processing this prescription at another workstation or at a later time, see Processing Prescriptions from the Data Entry Queue.
-
-
Select Process. The prescription opens in Rx Detail.
-
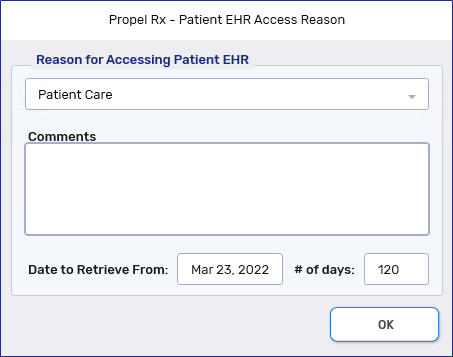
The Patient EHR Access Reason window opens if the patient's EHR Profile has not been viewed yet. Select a reason for accessing the patient's EHR Profile and enter any additional comments if needed. Select OK.
Review the patient's EHR Profile and select OK once done.
-
Verify the information in Rx Detail and make any necessary changes.
If Close is selected when in Rx Detail, the prescription remains in the Data Entry queue and can be accessed from there.
-
Select Fill to adjudicate the prescription.
-
The Claim Summary window opens. Review the window and make any necessary waives.
-
Select OK.
To refill a prescription from the patient's Profile tab:
-
Search for and select a patient.
-
Select the Profile tab.
-
Highlight the prescription(s) that need to be refilled.
-
Select Refill. The prescription(s) open in Rx Detail.
-
The Patient EHR Access Reason window opens if the patient's EHR Profile has not been viewed yet. Select a reason for accessing the patient's EHR Profile and enter any additional comments if needed. Select OK.
Review the patient's EHR Profile and select OK once done.
-
Verify the information in Rx Detail and make any necessary changes.
If Close is selected when in Rx Detail, the prescription remains in the Data Entry queue and can be accessed from there. For more information, see Processing Prescriptions from the Data Entry Queue.
-
Select Fill to adjudicate the prescription.
-
The Claim Summary window opens. Review the window and make any necessary waives.
-
Select OK.
Next Steps?
For more information, use the dropdowns below.
To refill a prescription from the Workbench:
-
From the Workbench, select Intake. The Intake window appears.
-
Do one of the following:
-
In the Refill Rx field, enter the prescription number and press Enter on your keyboard. If entering multiple prescription numbers, separate them using a forward slash (/).
-
Select the Profile button. Highlight the prescription(s) that are being refilled and select Refill. A R indicator appears beside the prescription(s) selected for refill. Select OK.
Information is automatically populated in the Patient, Prescriber and Drug sections based on the information from the prescription(s).
If you're only collecting the prescription from the patient and the prescription is being adjudicated at another workstation, or at another time, once you have a patient selected, you can select Add to Workbench. This adds the prescription to the Data Entry queue for later processing. It is recommended a prescription is scanned at Intake before doing this.
For more information about processing this prescription at another workstation or at a later time, see Processing Prescriptions from the Data Entry Queue.
-
-
Select Process. The prescription opens in Rx Detail.
-
Verify the information in Rx Detail and make any necessary changes.
If Close is selected when in Rx Detail, the prescription remains in the Data Entry queue and can be accessed from there.
-
Select Fill to adjudicate the prescription.
To refill a prescription from the patient's Profile tab:
-
Search for and select a patient.
-
Select the Profile tab.
-
Highlight the prescription(s) that need to be refilled.
-
Select Refill. The prescription(s) open in Rx Detail.
-
Verify the information in Rx Detail and make any necessary changes.
If Close is selected when in Rx Detail, the prescription remains in the Data Entry queue and can be accessed from there. For more information, see Processing Prescriptions from the Data Entry Queue.
-
Select Fill to adjudicate the prescription.